
VAN INSTALL PREPARATION FOR VW T5-T6 PANEL VANS
This page is crammed with really useful pointers to help you get your van ready for your install with us. It's broken down in to sections about the Floor, Side Panels and Roof and will run you through the recommended methods for sound deadening, insulating and carpet lining each of those parts of the van
FLOOR
If we're fitting your floor, the good news for you is that we'll be doing all of the preparation work for you. Happy days! So you can skip on to the next section about the Side Panels.
If you're collecting the floor for a self install, read on! The flooring is designed to fasten down using the tie down points in the floor of the van., so when preparing your van floor you'll need to make sure that these are still accessible. A SWB will have 6 D-Ring fittings, with the LWB van having an additional two. Attaching the floor this way means you won't need to place any battens down between the ribs of the floor, so no need for you to get all messy with an adhesive gun unless you really want to!
If you have a soft Kombi style floor fitted in your panel van, then you're work is done, you can simply fasten the ply floor panels down straight on top of the Kombi Floor. Super simple!
If you don't have any of that then you'll be starting with the bare metal floor and applying the sound deadening, such as 2mm Dodo Mat, we suggest laying this down covering as much or as little of the metal floor as you feel necessary. You can then lay your chosen insulation liner over the top . The Dodo Mat DEADN DUO Pro combines sound deadening and insulation in one product or if you are installing separate sound deadening, then Harrison Trim's Premium Gold underfloor insulation works well for that. Make sure to expose the tie down thread hole locations - you'll be grateful you did this later as it will saves you a lot of time in hunting around for the holes!

Things to consider
Side & Rear Threshold Trims:
The floors can generally be installed to sit on top of the door trims, but deeper trims are available to install over the edge of the ply floor. We can source these and have them included as part of your floor install or have them ready to collect for your self install if you let us know this is something you want at the time of ordering.
Rear threshold designs do vary so if you have only a small central moulding on yours, you can either leave the metal exposed, or trim with carpet. We cover how to apply the carpet in more detail later.
Transition between Cab and Load area:
If you're not having a bulkhead in your van, the lip of metal between the load area of the van and the cab space might be visible, so you may want to neaten this area up by applying a 50-100mm strip of carpet, tucking the edge underneath front floor.
If you're still unsure what to do, there are some excellent tutorial videos created by Combe Valley Campers and Kiravans over on YouTube. We've added a link to the one we think isthe most useful below:
Combe Valley Campers - How to professionally insulate your van floor
SIDE PANELS
If you're not taking advantage of our van preparation services, then this section will guide you through the best way to prepare the side panels of your van for some gorgeous Bala Birch Ply, or for warm and fuzzy carpet lined panels.
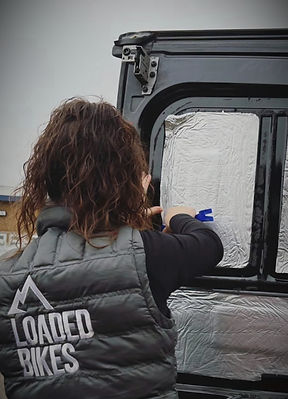
Sound Deadening and Insulation:
Sound deadening and insulation can be done in three stages; the first stage being the sound deadening which forms an acoustic barrier to reduce noise and vibrations through the metal sides. To be effective, it's recommended you cover at least 50% of the outer metal skin, but we would suggest that you cover as much of the outer skin as you can see whether that's the side panel, side door or rear door/s.
Kiravans and Combe Valley Campers have some great videos on this and if you've never done this before, we'd recommend watching these:
Combe Valley Campers – Sound Deadening for Beginners
Kiravans applying sound deadening to side panels


The next stage is where you start adding the insulation to all of the open areas and voids that will be beneath the wall panels.
There are several brands of closed cell foam backed insulation liner available, we would recommend a 10mm thick version. As with the sound deadening, apply this to the outer skin of the van over the top of the sound deadening to all of the areas you can see.
We install the ply panels to the sub structure of the van, so be careful not to over-insulate these areas. Do not insulate over the inner faces of the sub structure, carpeting these areas is fine, but insulation is not.
Do this to all side panels as well as the side, barn or tailgate doors.
If you want to be really neat, you can use a trim tool to ease the edges of the insulation behind the metal edge of the internal sub-structure.
Combe Valley Campers Beginners Guide to Sound Deadening & Insulation - Applying Thermoliner


The next stage is where you start adding the insulation to all of the open areas and voids that will be beneath the wall panels.
There are several brands of closed cell foam backed insulation liner available, we would recommend a 10mm thick version. As with the sound deadening, apply this to the outer skin of the van over the top of the sound deadening to all of the areas you can see.
We install the ply panels to the sub structure of the van, so be careful not to over-insulate these areas. Do not insulate over the inner faces of the sub structure, carpeting these areas is fine, but insulation is not.
The third stage is to add the thick thermal fleece or polyester Dacron material. You can cut and place this inside the voids within the substructure without the need to use any spray glue, but you will need the adhesive spray when adding this to the larger areas the ply panels will cover.
As with the foil backed foam insulation, be careful not to over-pack the Dacron as this will cause the ply panels to bulge and make them harder to fit - If the Dacron is too thickly applied, we may need to remove some when we come to install the panels. We will aim to repurpose this in any unfilled voids where we can, but we really dislike having to undo all your hard work, so bear that in mind as you fix it in place.
Apply the same method to the side, barn or tailgate doors, focusing on the top and bottom sections
Combe Valley Campers – Sound Deadening & Insulation for Beginners - Dacron


Carpet Lining:
Some parts of the side panels can still be seen when the ply panels are in place so it's best that these areas are carpet lined. You should include the following parts of the van:
B-pillars,
C-pillars,
Window surrounds,
Rear light cluster uprights,
Rear crossbeam above the rear doors.
You can choose whether you carpet over the Dacron or leave this exposed. Remember that the main side panels will be covered by the ply panels so don't worry if the finish isn't perfect; any imperfections in the finish will be hidden behind the ply!
When carpeting the areas around the doors and windows, be sure to remove the rubber trim carefully first. Once the edges of the carpet have been firmly stuck down and any excess cut away, you can refit the rubber trim, easing this gently over the metal edge and carpet using a flat trim tool.
Some customers decide not to carpet line the sliding door/s on their van, but this is entirely up to you. If you do decide to do this, remember that the door panels are an inset-style, so the outer shell of the door will be exposed. The same applies to the barn or tailgate doors, these will look fine without any carpet lining it's up to you if you carpet line these.
As we've mentioned, YouTube is a great resource to show how best to approach carpet lining if you've never done it before. Below are some of the videos we recommend to help you with this:
Combe Valley Campers Ultimate Beginners Guide to Carpet Lining
Kiravans How to Carpet Line A T5 T6
ROOF
We can do all the preparation work for the fitting of your roof panels for you, but if you like being hands on and want to do this yourself, this section is for you.
Sound Deadening and Insulation:
We fix the roof ply directly to the substructure of the roof, so you can apply your sound deadening and insulation between the substructure beams and within the voids in the same way as described above for the side panels.
The roof panel will be fixed to the lowest section of the sub-structure, so be careful not to pack this area with too much material.
Carpet Lining:
If you want a neater finish, you may choose to carpet line the sub-structure beams spanning the roof, this won't interfere with fixing the roof ply
The ply roof panels will be fitted close to the side panels, but there will still be a visible gap between those two areas. To give this area a neat finish, we suggest overlapping the carpet lining from the side panels on to the roof by around 150mm ceilings need a stopping point.
Front Section (Cab Headliner - for those of you with no bulkhead):
The factory-fitted section that connects the cab headliner to the sub-structure of the roof won't be needed anymore. This will be replaced with a section of gorgeous birch ply to finish the transition between the rear of the van and the front cab off nicely.
Allowing for light fittings and the wiring:
If you’ve got lighting in your roof panel, make sure you leave a long connecting wire trailing down to the front of the van, channelling the rest of the cables down the A pillar (where the seatbelt is installed) to allow us to connect in to your lighting.